PHOTO MANIPULATION
FASHION TECHONOLOGY
FASHION TECHONOLOGY
PHOTOSHOP EXPLORATION:
DIGITAL EFFECTS STUDY
For this project, I experimented with Adobe Photoshop using one original photo and creating three different visual effects. I chose to do a VHS Glitch, a Dual Lighting Effect, and a Skull Face Effect. The goal was to explore Photoshop tools, layers, masks, and blending modes while learning how to build stylized edits from scratch by following professional tutorials.
This was an individual project, completed independently. However, I referenced professional tutorials to guide my technique and applied each method in my own creative way.
THE PROCESS
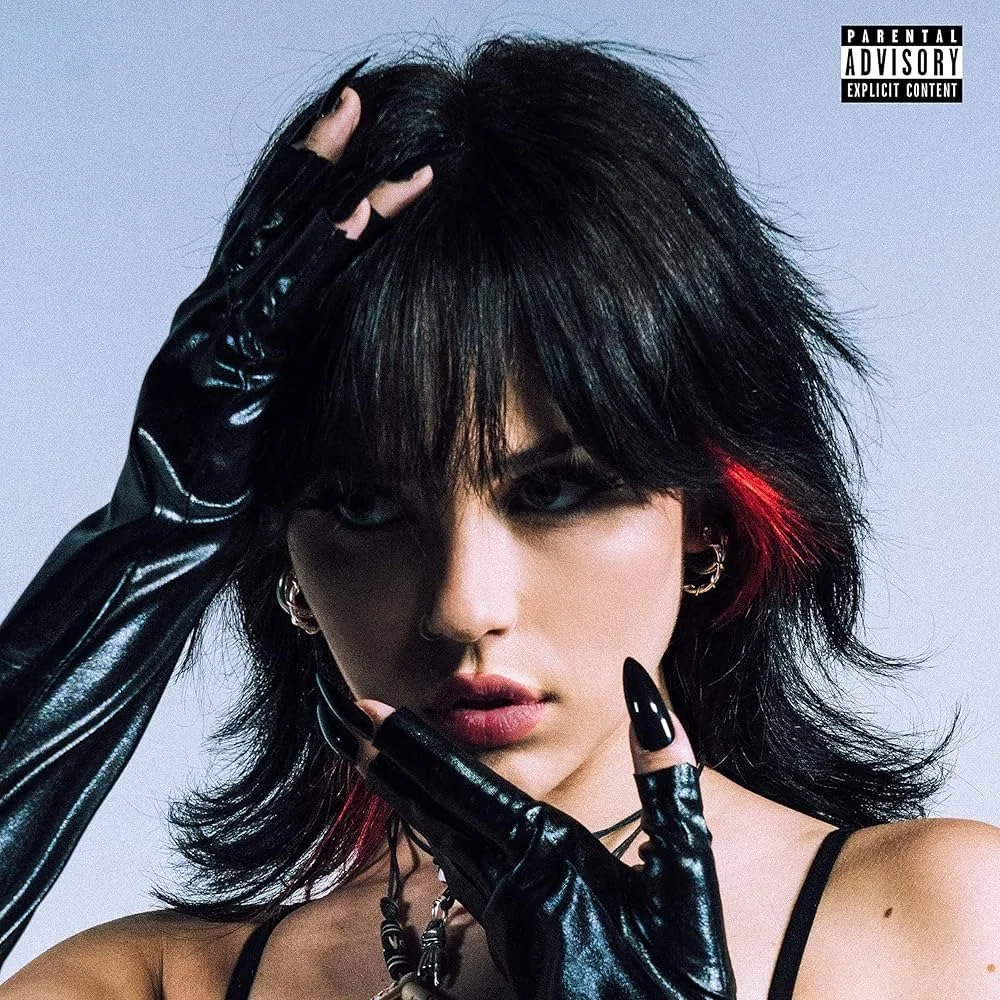
Original Photo
-
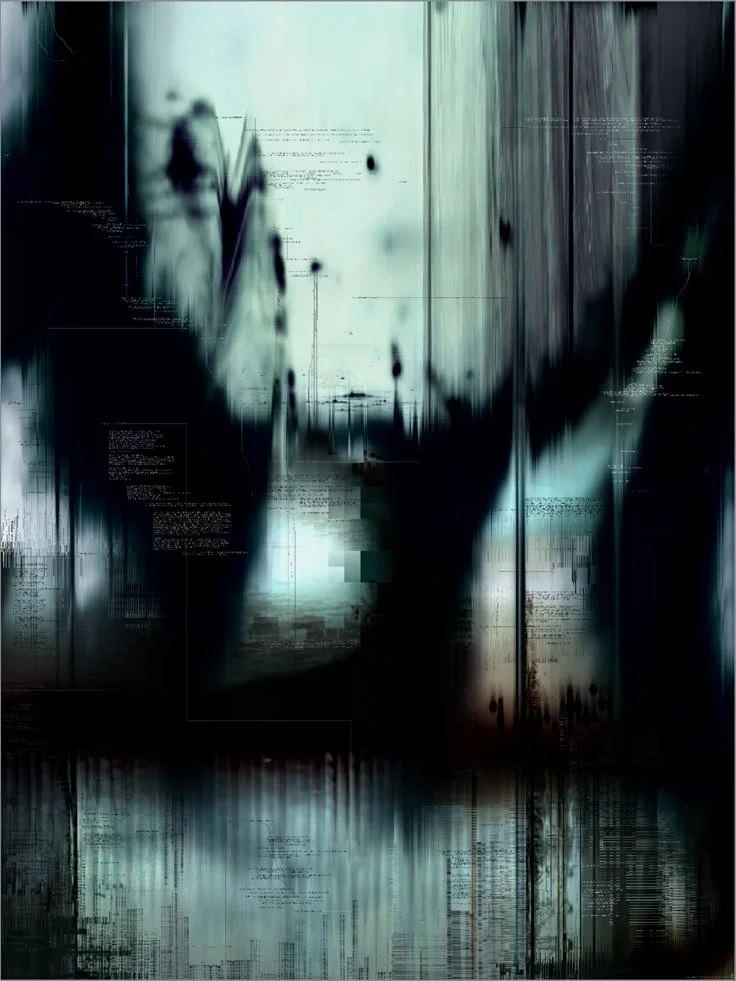
To achieve a retro digital distortion, I duplicated layers, manipulated RGB channels, shifted color layers horizontally, and added noise and halftone textures. Masking out rectangular strips created the glitch streaks seen in old VHS footage.
Directions: File, open, choose photo, duplicate 4 layers (right click>duplicate), make all layers except for the first two invisible (click the eye icon to hide layers), double click on the 2nd layer, uncheck green and blue channels, OK, click V, hold shift, move 2nd layer 30 pixels to the right, make 3rd layer visible (click the eye icon), double click 3 layer, uncheck red and green channels, OK, click V, hold shift, move 3rd layer 30 pixels to the left, make 4th layer visible, layer, new adjustment layer, hue/saturation, increase saturation to 100%, OK, right click on hue/saturation layer, create clipping mask, add layer mask to 4th layer (3rd icon on the bottom right bar), hold alt + left click, paint bucket, fill to black, rectangle marquee tool, make rectangles across the canvas, paint bucket tool, fill the rectangles with white, add new layer (6th icon on the bottom right bar), paint bucket, fill it white, filter, filter gallery, sketch, halftone pattern, set settings to size: 2, contrast: 2, pattern type: line, OK, double click on the layer, set settings to brush mode: overlay, opacity: 25, uncheck red and blue, OK, right click, duplicate, command/ control + T, shift and rotate layer to 90 degrees, double click on the layer, set settings to brush mode: normal, opacity: 15, check red only, OK.
-
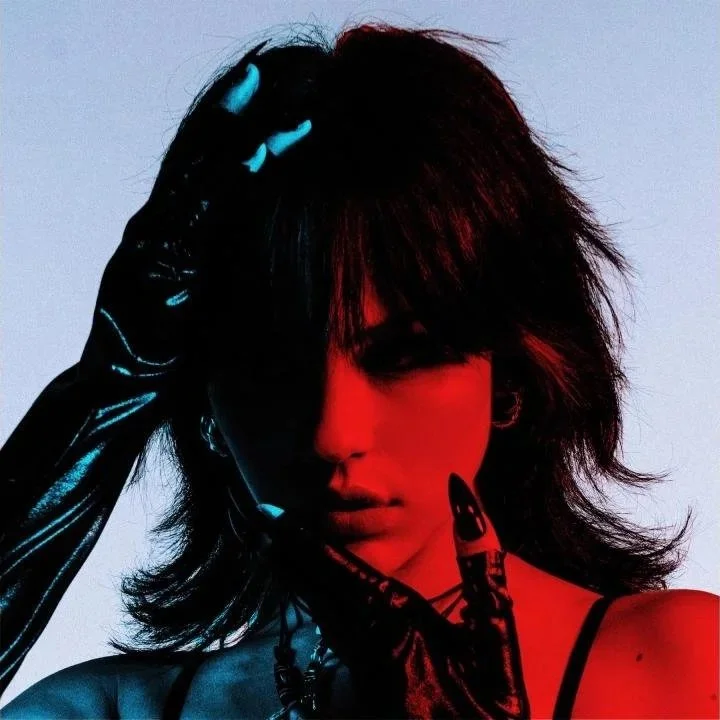
Using a skull image and my portrait, I aligned both layers and used layer masks to selectively reveal parts of the skull, blending edges and adjusting hues to match skin tone. I followed a professional tutorial to practice masking precision and tonal matching.
Directions: File, open, choose photo, click open to close, duplicate layer (command/ control + J), save a skull image on google, insert skull photo by dragging the photo into the canvas, reduce opacity to see and line up skull to face, command/ control + T and hold shift to keep dimensions, release to stretch, change opacity to 100%, create a layer mask (3rd icon on the bottom right bar), image, adjustments, invert, click the layer mask (3rd layer, black box), brush tool, click the white box on the toolbar (left bar), command/ control + to zoom in, reveal as much of the skull as you want, reduce opacity on the outer edges to blend better, command/ control + Z to undo, image, adjustment, hue/saturation, adjust to match the skull with the person's skin tone.
-
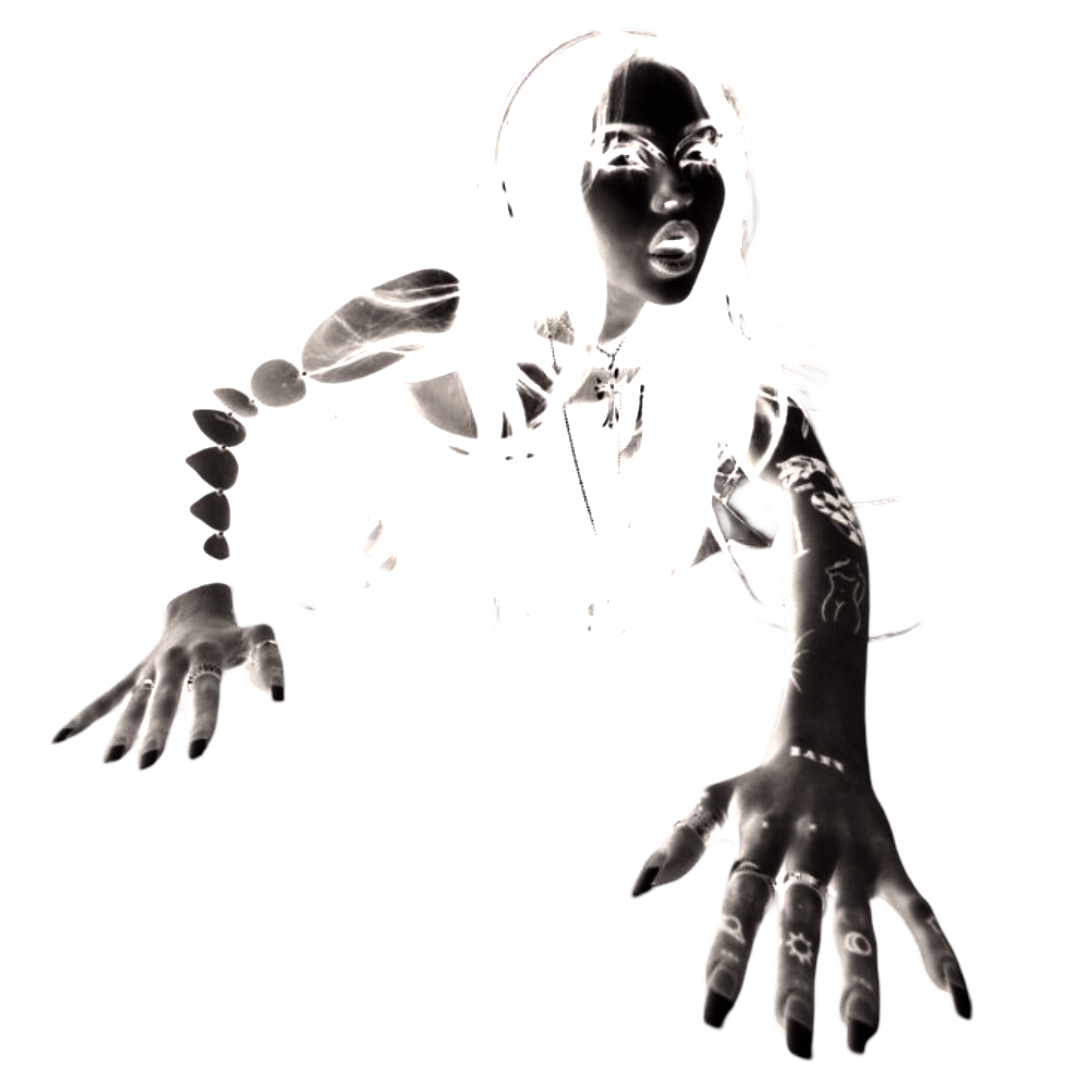
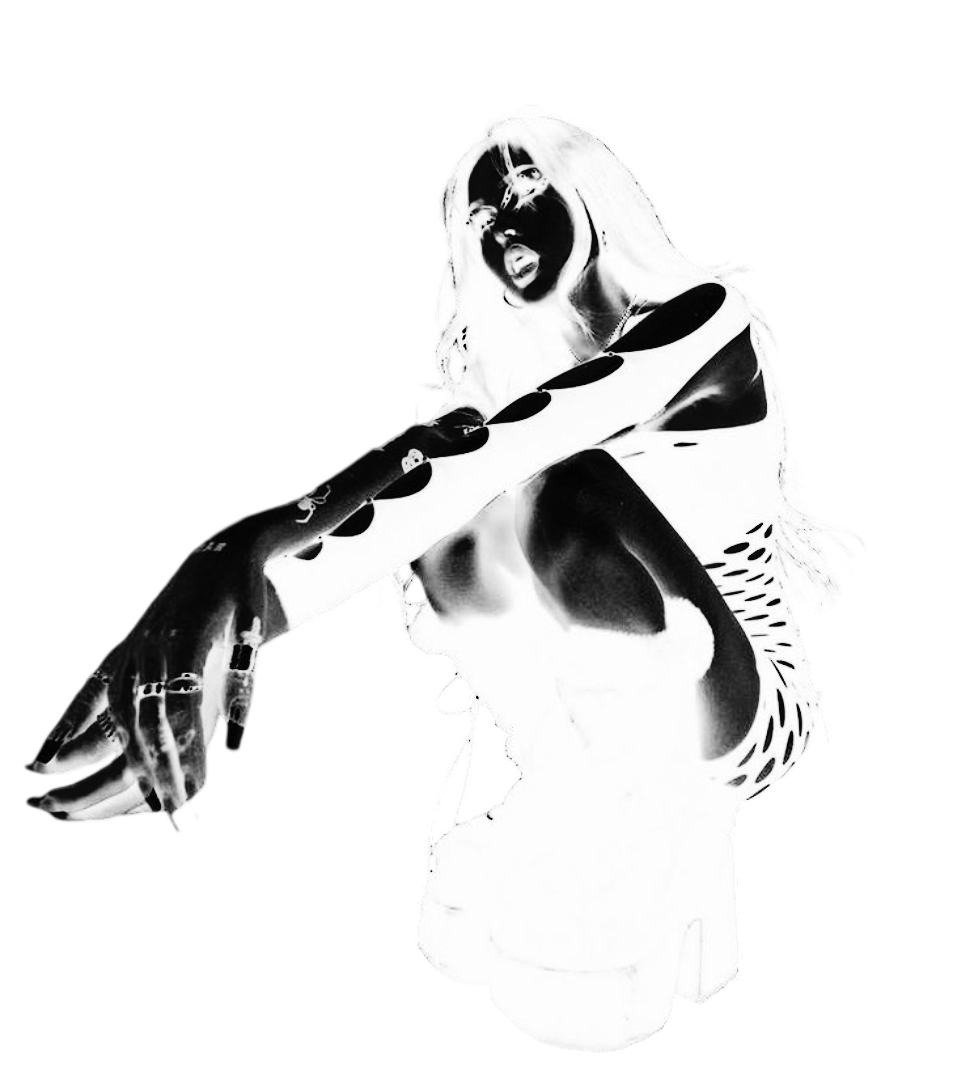
I isolated the subject, added gradient maps, and used the brush tool to paint red and blue light onto opposite sides of the face and body. By duplicating and inverting layers, I created a realistic dual-light glow using hard light blending and custom color adjustments.
Directions: File, open, choose photo, click open to close, select, subject, create a new layer group (5th icon on the bottom right bar), create a layer mask (3rd icon on the bottom right bar), click new adjustment layer (4th icon on the bottom right bar), black&white, click the layer thumbnail (2nd layer, right box), click new adjustment layer, gradient map, click the gradient map preview (black and white ombre bar under the properties tab), double click the white box, set color to light blue, OK, open blending mode drop down, hard light, decrease opacity to 90%, brush tool, open brush presets on the top bar, set brush size to 150 pixels and hardness 0%, paint the right side where you think the red light will hit the persons face and body, duplicate (command/ control + J), invert (command/ control + I), click the gradient map preview, double click the blue box, set color to red, OK.
SKILLS
-
Layer Management -
Organized multiple layers for each effect, duplicating, masking, grouping, and adjusting them to build clean, non-destructive edits.
-
Blending Modes & Color Channels -
Used Hard Light, Overlay, Normal, and channel manipulation (RGB channels) to create lighting changes, color separation, and glitch effects.
-
Masking & Brush Techniques -
Applied layer masks and the brush tool to reveal or hide specific areas, blend textures, and refine edges—especially for the Skull and Dual Lighting effects.
-
Color Adjustments -
Adjusted hue, saturation, gradients, and black & white layers to match tones, elevate lighting, and create atmospheric color treatments.
-
Technical Problem-Solving -
Encountered and resolved issues like mismatched tones, alignment challenges, masking errors, and blending inconsistencies, strengthening my overall Photoshop workflow and troubleshooting skills.
-
Digital Creativity -
Used experimental thinking and visual direction to adapt each tutorial to my own style, making all three edits unique to me.
OUTCOME
This project strengthened my confidence in Photoshop, especially in working with masks, channels, blending modes, and adjustment layers. I learned how to follow professional editing workflows while adapting them creatively. The final results demonstrate my ability to transform a single image into three distinct visual styles using advanced editing techniques.

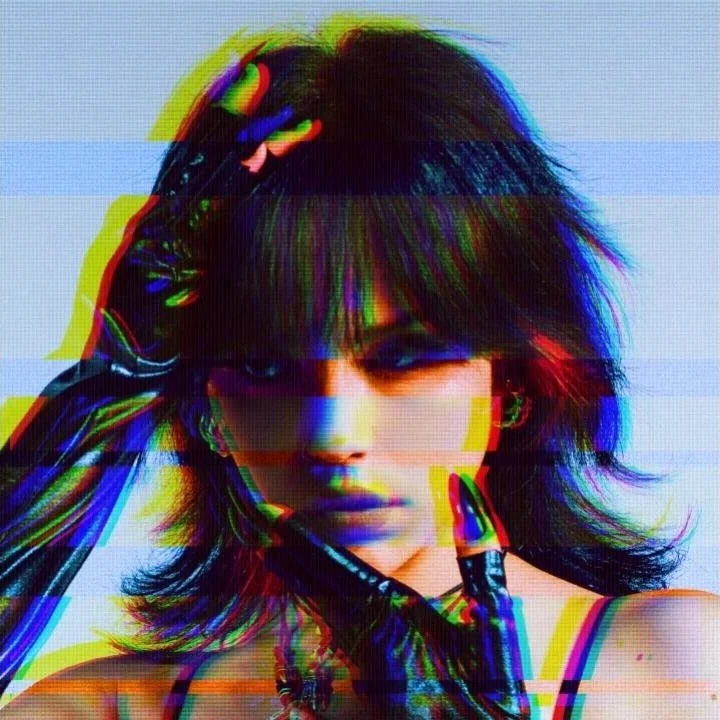
VHS GLITCH EFFECT
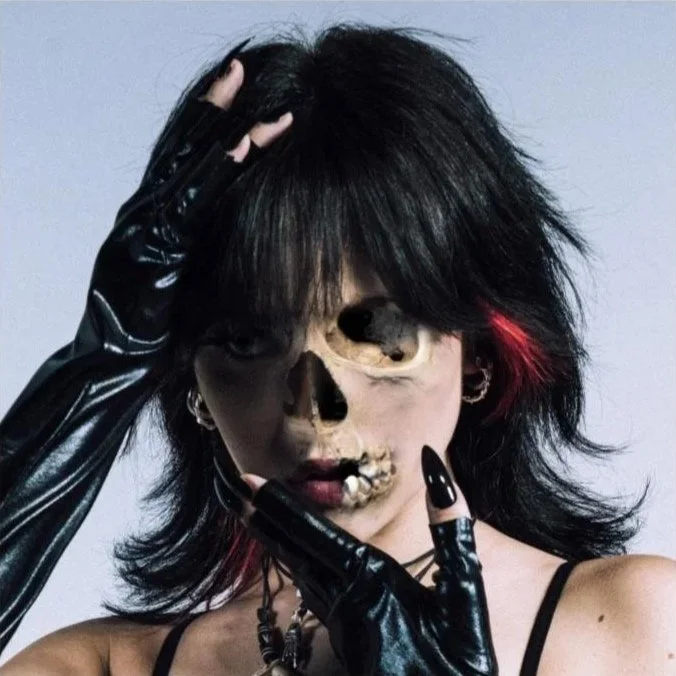
SKULL EFFECT